I like to refer to the JCS ornament magazine for directions on how to make cording, but if you don't know how to make cording, you can leave a post and I will email you directions on how to make cording. Or....you can do like most people and just Google the web to check for directions.
First you have to sew the front of the ornament to the back and close the opening.
Next, I start at the bottom of my ornament and find the middle to start pinning the cording down all the way around the stuffed ornament. I pin into the sewn seam to just hold the cording in place.
Here I've gotten to the top of the ornament, and I have made a loop which will be the hanger for the ornament. I have pinned both parts of the cording right in the middle. There are several ways to finish the ornament at the top for the hanger but for this ornament, I've just done the loop method. I will show you at the end how it will be "finished" off on the loop.
Once I've gotten the cording pinned down all the way around the ornament, I can now apply a small amount of glue to the part of the cording that I need to cut off. I use Aleene's Fast Drying Glue because it does dry fast. I only put a little bit all the way around the cording so as to hold it together and I pinch the part I want to be the final end. I glue another spot just about 1/2" from where I just glued. Once the glue is dry, I cut the cording between the 2 spots that I glued. This give a nice finish so you can place the remaining cording over to cover up the glued portion.
I hope you can see in this picture where I glued. It is just above the part that is the beginning of the cording.
Once your glue has dried and you have a nice pinched cut end, you can start sewing the cording onto your ornament. I sew "in the ditch" of the cording. What that means is that I sew in between the 2 colors.....or however many colors you have made into a cording. I carefully catch part of the seam that you sewed the stitched front to the backing while laying the sewing thread next to the cording color. In this case, the color I am sewing the cording on is white DMC floss to match the white in the cording. When you sew in the ditch, you don't really see the "sewing" thread that is holding the cording onto the ornament.
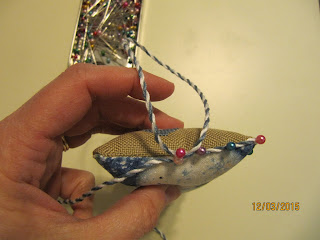
I've turned the ornament sideways to just show you what I mean my laying "in the ditch". I hope this helps you understand better.
After you have sewn the cording all around the ornament, I tack over the glued portion of cording where I started sewing the cording on. Just a few tacks over it will suffice.
Then I take my needle and go through the beginning loop that will eventually be sewn on top of the cut portion of the cording which was where you began sewing. This loop will cover the glued cut portion.
Carefully tack that loop over the cut cording portion.
After you have tacked the cording down, slip your needle into the seam underneath the cording that you have sewn on and bring back up about 1" down and pull the needle and thread through to the top. Carefully pull on the thread and cut it as close to the ornament without cutting your sewn on cording. This will hide your cut end inside your ornament.
Now to do the finishing for the loop on the hanger. Thread your needle with white thread or whatever color you want to wrap the loop in. Poke in just under the loop and bring your needle to the front.
Hold your hanger in between 2 fingers while you wrap the thread around the base of the loop. Continue to wrap around until you have it secured enough.
Once you've wrapped it enough, poke your needle into the seam from the back and bring the needle back up to the front side once again. Snip the thread close to the cording, and it will bury the cut end on the inside also.
One final step I like to do is to glue a small amount on the backside of the top middle where the hanger is located. This is just to secure the cording at the loop at the top middle hanger.
As an alternative method for securing the top hanger loop, you can take a small piece of ribbon and tie a bow tightly around the cording hanger. This will give another nice finish for your ornament.
I hope this cording tutorial has helped you.
Happy Stitching!


Love your PS Santa finish! Very nice tutorial on how to attach cording!
ReplyDeleteAha!! Now I know the secret! But I still have not tried 'making' the cording!! I really must! Hugs!
ReplyDelete